SEO and Page Performance in dotCMS
Search engine optimization (SEO) has gotten a lot more complicated over the past few years. Back in the old days (you know 2016), SEO primarily referred to on-page optimizations. Things like page title, meta descriptions, header tags, image alt tags, and so on, but things have gotten a lot more technical with the latest Google updates. Last year, site speed became one of the signals used to rank pages, but page speed isn't just crucial for SEO; it's also essential to the user experience. Pages with a longer load time tend to have higher bounce rates and lower average time on page. Longer load times have also been shown to adversely affect conversions rates.
In this blog, I'll show you how to do some simple things to ensure your pages are performing well and we’ll take a look at some code examples of how to programmatically ensure best practices for page performance. We will be using Google’s Lighthouse developer tool to monitor our improvements and progress as we shoot for a score of a 100 for the performance.
Once you have Lighthouse installed, let’s test one of your pages to get a before and after benchmark or a performance score for the site before we make these changes. For this blog, I'm testing only for the desktop; however, all of the topics we’ll discuss are critical for mobile performance as well.

Performance
Before we start, let's take a look at a quick performance checklist. Some of these tasks are outside the scope of the dotCMS platform and are something your IT department or server administrators will need to set up. If you’re running on dotCMS Cloud, we’ve already taken care of most of this for you. In addition, I’ll try to provide links to tools that will allow you to check that things are set up correctly. It’s not that we don't trust our IT department, but it's always good to double check.
Cache Headers
Make sure your cache controls are set up correctly on your server. For JS, CSS, and image files, I recommend setting your Cache-Control: public, max-age=31536000. This will cache the files for 365 days. You should also add unique hash digits to your CSS, JS, and image files this will force the browsers to redownload the file when there are changes. In dotCMS you can use the file’s inode. The inode is the version number of the file and changes every time you make an edit. Here is a handy tool to check your cache settings to make sure they are set up correctly.
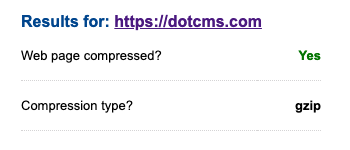
Gzip Compression
Have your server administrator setup Gzip data compression utility on your server. This will compress and decompress files that are sent, minimizing their size during transfer. The easiest way to test if Gzip is setup correctly is with gzip test:
HTTP/2
For optimal performance, you should use HTTP/2 and not the older protocol, HTTP/1. Here is a quick rundown of the steps your team will need to get HTTP/2 setup and running on your dotCMS server:
- Ensure HTTPS is enabled; Purchase an SSL or TLS certificate
- Make sure the underlying network infrastructure, including server software, supports HTTP/2
- Update and configure your servers to support HTTP/2
- Test your configuration by using HTTP/2 Test

Load JavaScript Asynchronously
Whenever possible, try to load your JavaScript file asynchronously and place the call just before the end
tag of the page. Location matters, putting the script after the rest of the page is loaded will improve page performance. This is especially true on older browsers that don't support theasync property. Your code should look something like this:
    <script async src="script.js"></script>
</body>
Reduce HTTP Requests
Basically the more requests your page makes, the longer it takes to load. So it’s best to try to minimize the number of requests. Here are some simple things you can do to minimize requests:
- Combine your JS and CSS files
- Use SVG background styles instead of icons
- Combine multiple images into a single sprite
Image Sizing
Always try and deliver the appropriately sized image as there is nothing more annoying than hitting a page that has a 1MB thumbnail image. This is where a good CMS can help. In dotCMS, we have a RESTful image resizer that will resize and cache any image, and when combined with the picture element, can deliver multiple versions of the same image based on the user's viewport or image location on the page.
Picture Element
The picture element makes it easy to provide images that are adapted to the medium they are viewed on. Instead of having one image that is responsive and scaled up or down based on the viewport width, multiple sized images can be served. The benefit is that only the image of the proper dimension is served, potentially saving bandwidth. Think mobile first, and try to use the mobile version in your src tag. This allows the browser to get larger versions if the viewport requires it, but we’ll cover this in more detail in a minute.
Lazy-load Offscreen Images and Videos
Lazy loading images and video to reduce initial load time, page weight, and system resource usage, including battery life will have a positive impact on page performance. There is no reason to ask your visitor to download images they may never see.
Accelerated Mobile Pages (AMP)
Provide AMP versions of your pages, or at least some of your pages, such as events, blogs, and news articles. Make sure to use rel tag letting search engines know about the AMP version of the page. This coupled will a Canonical URL will tell search engines that the pages are the same.
<link rel="canonical" href="/url/to/html-version.html">
<link rel="amphtml" href="/url/to/amp-version.html">
Learn more about getting started building AMP pages.
Getting it Done in dotCMS
Image Sizing
Using the dotCMS REST service to resize and even compress images is simple and can be done in the container, template, content or any vtl file. The code may vary slightly depending on where you’re calling the image, but the basic structure of the image path is the same.
/dA/{identifier}/{filters}/Example: So, this is what the code would like if we wanted to resize an image to 200px wide and compress it to 75% quality:
<img src=”/dA/${ContentIdentifier}/200w/jpeg/75/$!{imageBinaryFileTitle}” alt=”$!{description}”>Results:
<img src=”/dA/4a3d5d01-a08f-4709-8834-a96cb5d2b0e3/200w/jpeg/75/slide-corporate-3.jpg alt=”sample image”>These are just two of the many filters dotCMS’s image service supports. Check out the documentation section on processing and resizing images to learn more.
Picture Element
Now that we have taken a look at resizing images in dotCMS, implementing the picture element should be pretty straight forward. I typically use the picture element in containers. Here is how the code would look like in a container using the common breakpoints. Again, notice how I used the mobile size in the src tag.
<picture>
    <source media="(min-width: 1200px)" srcset="/dA/${ContentIdentifier}/1024w/jpeg/$!{imageBinaryFileTitle}">
    <source media="(min-width: 992px)" srcset="/dA/${ContentIdentifier}/952w/jpeg/$!{imageBinaryFileTitle}">
    <source media="(min-width: 768px)" srcset="/dA/${ContentIdentifier}/728w/jpeg/75/$!{imageBinaryFileTitle}">
    <img src="/dA/${ContentIdentifier}/324w/jpeg/75/$!{imageBinaryFileTitle}” alt="$!{description}">
</picture>
Lazy-load Offscreen Images
There many techniques to lazy loading images and entire blogs dedicated to the topic. One I would recommend is from Rahul Nanwani, The Complete Guide to Lazy Loading Images. All of the techniques covered in his blog can be implemented in dotCMS; however, I’m going to show you a simple and quick way to defer images so they don’t slow down the initial rendering. Again we are just deferring the images from being loaded, not preventing off-screen images from being loading until viewed.
Basically, we want to provide a placeholder in the image src property and the actual image path in the data-src property:
<img src="data:image/png;base64,R0lGODlhAQABAAD/ACwAAAAAAQABAAACADs=" data-src="/img/managing-content.svg">After you have your images set up, add the following JavaScript just before the close body tag on every page. This will replace the image src with the data-src once the page has been loaded:
<script>
    function init() {
        var imgDefer = document.getElementsByTagName('img');
        for (var i=0; i<imgDefer.length; i++) {
            if(imgDefer[i].getAttribute('data-src')) {
                imgDefer[i].setAttribute('src',imgDefer[i].getAttribute('data-src'));
            }
        }
    }
    window.onload = init;
</script>
The Final Results
So here it is, after all of our changes our final Lighthouse score is 100!
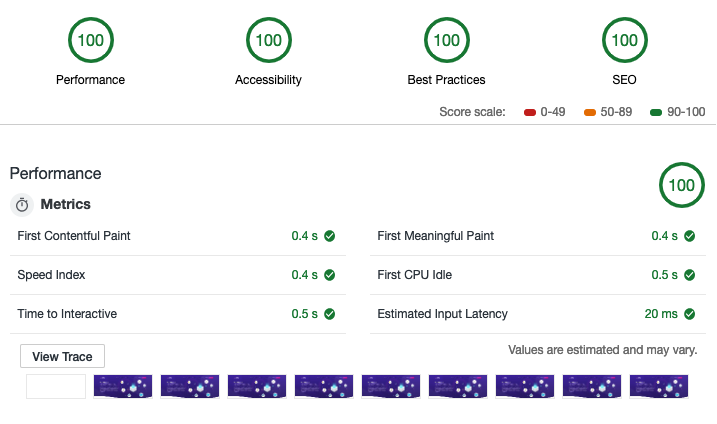
Disclaimer: Not all pages on our site score of 100. There are many pages that use resources that we are not in our control and may affect the score to varying degrees.
I know I’ve barely scratched the surface of optimizing your page performance for better SEO and, even more importantly, a better user experience, but I hope some of the concepts I discussed will help you better utilize dotCMS to automate some of these technical challenges for your content contributors.
Recommended Reading
Benefits of a Multi-Tenant CMS and Why Global Brands Need to Consolidate
Maintaining or achieving a global presence requires effective use of resources, time and money. Single-tenant CMS solutions were once the go-to choices for enterprises to reach out to different market...
Headless CMS vs Hybrid CMS: How dotCMS Goes Beyond Headless
What’s the difference between a headless CMS and a hybrid CMS, and which one is best suited for an enterprise?
14 Benefits of Cloud Computing and Terminology Glossary to Get You Started
What is cloud computing, and what benefits does the cloud bring to brands who are entering into the IoT era?